Paging, sorting, and searching using EF Code first and MVC
02 Jan 2012 · CommentsIntroduction
In this blog post, I am going to show you how to search, paginate and sort information retrieved from a real database using Entity Framework Code First approach.
We are going to use SQL Server and the AdventureWorks Light database. AdeventureWorksLT is a good example. It is a stripped down version that contains only 12 tables compared to the 70 tables in the AdventureWorks full database. You can download it from http://msftdbprodsamples.codeplex.com. Alternatively, I generated a Transact-SQL script file which contains the whole database.
Installing AdventureWorksLT database
To run the script file, first extract the AdventureWorks.sql to your hard disk. If you have SQL Server Management Studio, you can open the script file and run it by hitting F5. Make sure you change the files path as highlighted below:
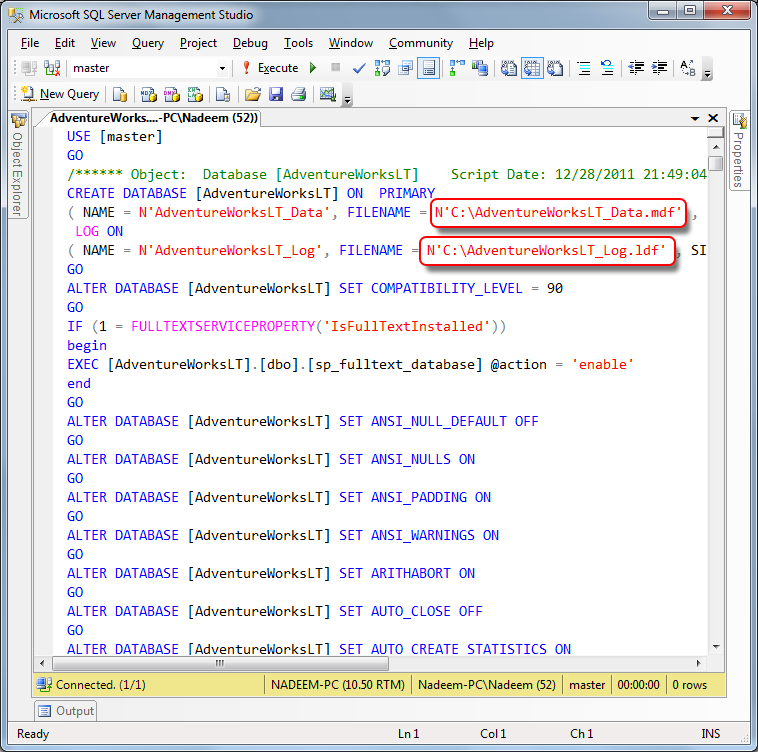
If you don’t have Management Studio, click Start, click Run, and type sqlcmd –S (local) –i "%temp%\AdventureWorks.sql"
In my case, I extracted the file to the temporary folder on my hard disk, so you might need to adjust the file path.
Creating the MVC 3 web application
Select File, New Project, and choose ASP.NET MVC 3 Web Application after clicking the Web item on the left. Type AdventureWorksLT as the project name, and click OK.

Now choose the Internet Application template and make sure Razor is selected as the View engine.

Package Manager Console
We’ll need to install Package Manager Console in case you don’t have it already installed.
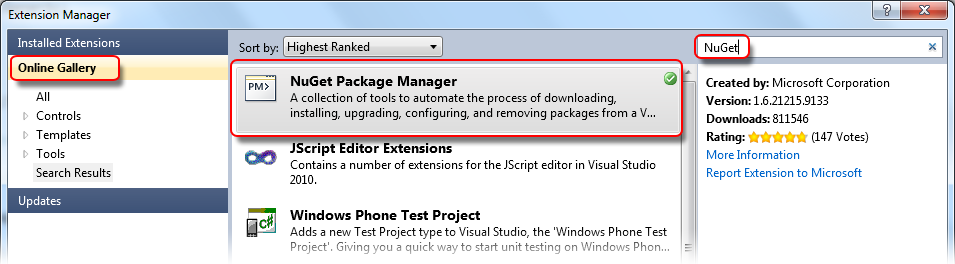
Select Tools, and click Extension Manager. Choose Online Galery from the left pane. Type NuGet in the search box and wait a few seconds. Select NuGet Package Manager. Click Download. If you see a green check mark on the right side, this means the item has already been installed. You might need to restart Visual Studio after installation.
Entity Framework
We are going to use Entity Framework 4.2 as it is the latest release at the time of writing this post. If you don’t have it already installed, open Package Manager Console

and type the following command:
Install-Package EntityFramework
And this installs the latest version for the current project.
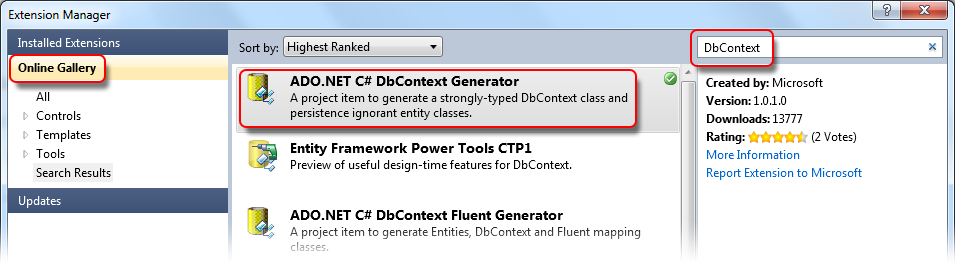
There is one more thing we need to install. Select Tools, and click Extension Manager. Choose Online Galery from the left pane. Type DbContext in the search box and wait a few seconds. Select ADO.NET C# DbContext Generator. Click Download. If you see a green check mark on the right side, this means the item has already been installed.
Generating classes for our model
Usually, you’ll use Code-First with databases that already exist. In this case, we have AdventureWorksLT.
Right click on the Models folder under Solution Explorer pane. Click Add, choose New Item.

Select Data from the Installed Templates pane. Click on ADO.NET Data Model, and type AdventureWorksLTModel.edmx in the name box. Click Add.
A new dialog appears, choose Generate from database item.

Click Next.
Choose New Connection from the new dialog. Configure the new dialog like below:

Your configuration depends on the edition of SQL Server that you have installed on your machine, so your configuration may not be exactly the same as above.
Click Test Connection to make sure everything is OK. You should see Test connection succeeded. Otherwise, make sure your server name and database name are both correct. When you click the down arrow in the textbox field, you’ll see some options from which you can choose.
Click OK.
Click Next.
Just select Tables and click Finish.
You’ll see that EF has generated entities from our database. Right click anywhere in the whitespace and choose Add Code Generation Item

Select Code from the Installed Templates pane. Click on ADO.NET DbContext Generator, and type AdventureWorksLTModel.tt in the name box. Click Add.

This will generate a DbContext class for our project, and a new class for each table that exists in the database.

Preparing the Controller
Now we need to retrieve information from the database. Open HomeController.cs and add the following lines of code.

We also need to add a new action to retrieve the products from our database. Add the following new action.

The Products action is restricted to the HTTP GET request. It is a good practice to use GET for actions that do not modify any data.
We are fetching all the products that exist in our database, and we are executing the query immediately by calling the ToList() method. We need to create a new view that will display the products to the end user.
Compile the project first and then right click within the Products action. Choose Add View. A new dialog appears. Check Create a strongly typed view, and choose Product (AdventureWorksLT.Models) from the Model class combo box. Also make sure that all the other options are like below:

Click Add.
We created a strongly-typed view. We want this view to show products information in a table. Modify the new generated view so that it looks like below:

Note that we re-defined the model to match our real model which is a list of products, not a single product.
We also defined an HTML table. We started by creating a header row that will hold the column titles. For every product in our database, we are interested only in a certain subset of its columns, not all of them. We are also showing a different background color for alternate rows using the modulus (%) operator.
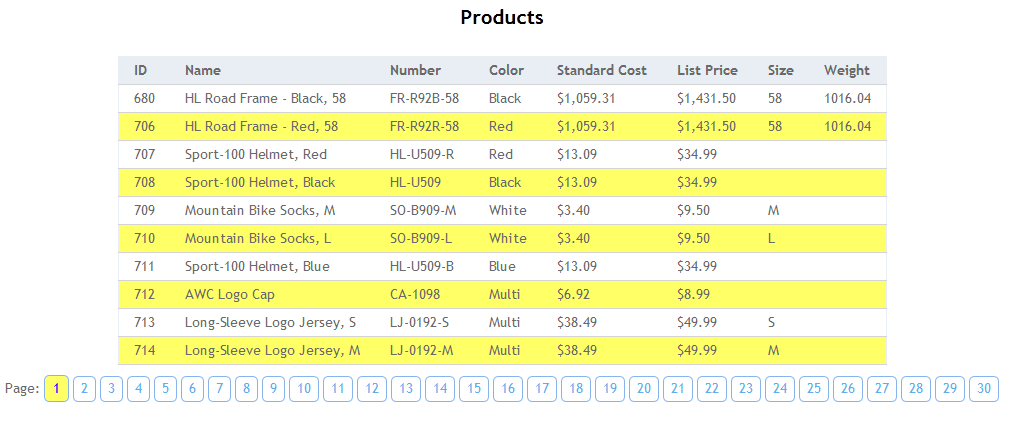
Run the application now and type http://localhost:4843/home/products in your browser’s address bar. The port number might be different on your machine, so make sure you type the correct value.

If your table doesn’t look like this, then you need to copy the styles from the CSS file in the attached project.
As you can see, the table is showing all the products. It would be much better in terms of performance and usability to show only a few products at a time, and allow the user to navigate through these sets using hyperlinks. We call this pagination. Let’s make our website support pagination.
Modify the action Products in HomeController.cs like below

Now if you compile the application and refresh your browser, you’ll see only the first 10 products.

We defined a new variable called pageSize, which represents the maximum number of products we want to show at a time.
The OrderBy() method sorts the products by a specified property (ProductID in this case). We’ll allow the user eventually to order products by any column they want. Anyway, The Skip() method skips a specified number of products. The expression (page -1) * pageSize skips all the products before the specified page. The Take() method only selects a certain number of products, which is pageSize.
We also defined the page parameter in the action Products, so that our users can select which page (ie subset of products) they want. We also made this parameter optional, so if the user does not supply a value, it will hold a default value of 1.
Currently, the only way to navigate through our products is to specify the page number in the browser’s address bar directly like this http://localhost:4843/home/products?page=2. This is not a good approach and do not expect the end user to do it. We have to make things as easy as possible for our users.
We will show page links so that users can navigate easily through our products. First, we have to think of what things we need in order to create page links. We basically need three things:
- Number of pages (we need the total number of products for this)
- Page size (we already have it)
- Current page number (we already have it)
We add these new variables in the Products action like this:
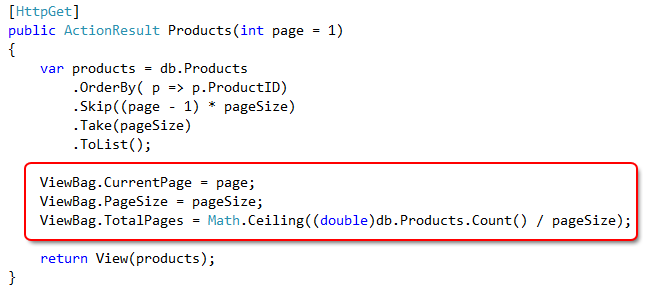
Some developers like to wrap these in a view Model instead of passing the values through the ViewBag property.
Now we need to show page links in our view Products.cshtml

The current page link is highlighted, so the user knows exactly which page is currently shown. The link for each page simply points to the same action Products but with a different value for the parameter page.
If you compile and refresh your browser, you’ll see the following:
Oops!! Too many page links!
The links work fine. However, they are too many which makes our gridview look ugly, let’s show a few page links at a time.
Modify the view Products.cshtml so that it looks like below
@model IList<AdventureWorksLT.Models.Product>

@{
    ViewBag.Title = "Products";
}


@helper buildLinks(int start, int end, string innerContent)
{
     for (int i = start; i <= end; i++)
     {
         <a class="@(i == ViewBag.CurrentPage ? "current" : "")" href="@Url.Action("products", "home", new { page = i })">@(innerContent ?? i.ToString())</a>
     }

}


@helper pageLinks()
{
    const int maxPages = 11;

    if (ViewBag.TotalPages <= maxPages)
    {
        @buildLinks(1, (int)ViewBag.TotalPages, null)
        return;
    }

    int pagesAfter = ViewBag.TotalPages - ViewBag.CurrentPage; // Number of pages after current
    int pagesBefore = ViewBag.CurrentPage - 1; // Number of pages before current

    if (pagesAfter <= 4)
    {
        @buildLinks(1, 1, null) // Show 1st page

        int pageSubset = ViewBag.TotalPages - maxPages - 1 > 1 ? ViewBag.TotalPages - maxPages - 1 : 2;
        @buildLinks(pageSubset, pageSubset, "...") // Show page subset (...)

        @buildLinks(ViewBag.TotalPages - maxPages + 3, ViewBag.TotalPages, null) // Show last pages

        return; // Exit
    }

    if (pagesBefore <= 4)
    {
       @buildLinks(1, maxPages - 2, null) // Show 1st pages


       int pageSubset = maxPages + 2 < ViewBag.TotalPages ? maxPages + 2 : ViewBag.TotalPages - 1;
       @buildLinks(pageSubset, pageSubset, "...") // Show page subset (...)

       @buildLinks(ViewBag.TotalPages, ViewBag.TotalPages, null) // Show last page

        return; // Exit

    }

    if (pagesAfter > 4)
    {
        @buildLinks(1, 1, null) // Show 1st pages

        int pageSubset1 = ViewBag.CurrentPage - 7 > 1 ? ViewBag.CurrentPage - 7 : 2;
        int pageSubset2 = ViewBag.CurrentPage + 7 < ViewBag.TotalPages ? ViewBag.CurrentPage + 7 : ViewBag.TotalPages - 1;

        @buildLinks(pageSubset1, pageSubset1, pageSubset1 == ViewBag.CurrentPage - 4 ? null : "...") // Show 1st page subset (...)

        @buildLinks(ViewBag.CurrentPage - 3, ViewBag.CurrentPage + 3, null) // Show middle pages

        // Show 2nd page subset (...)
        // only show ... if page is contigous to the previous one.
        @buildLinks(pageSubset2, pageSubset2, pageSubset2 ==  ViewBag.CurrentPage + 4 ? null : "...")
        @buildLinks(ViewBag.TotalPages, ViewBag.TotalPages, null) // Show last page

        return; // Exit

    }
}
<h2 class="center">Products</h2>

<table class="products">
 @* header *@
 <tr>
    <th>ID</th>
    <th>Name</th>
    <th>Number</th>
    <th>Color</th>
    <th>Standard Cost</th>
    <th>List Price</th>
    <th>Size</th>
    <th>Weight</th>
 </tr>


@{int i = 1;}
@foreach (var p in Model)
{
    <tr class="@(i++ % 2 == 0 ? "highlighted" : "")">
        <td>@p.ProductID</td>
        <td>@p.Name</td>
        <td>@p.ProductNumber</td>
        <td>@p.Color</td>
        <td>@p.StandardCost.ToString("C")</td>
        <td>@p.ListPrice.ToString("C")</td>
        <td>@p.Size</td>
        <td>@p.Weight</td>
    </tr>
}

</table>

<div class="pagination">
Page:
@pageLinks()
</div>
Don’t worry if you do not understand completely the second helper as it is a little awkward.
We simply added two inline helpers. The first one, buildLinks, generates hyperlinks for pages with numbers between start and end. The parameter innerContent sets the inner html content for the hyper link. If this value if null, then we use the page number. We only used it for the page subset symbol ...
The second helper, pageLinks, which is very smart, depends on buildLinks to generate the required hyper links for pagination and shows only 11 links as a maximum.
Now refresh your browser and you should see a professional pagination tool:

Sorting
Now that we have enabled pagination, we also would like to allow the user to sort the products. Sorting is usually done in the database, and not in C#.
If you notice in the Products action, we already performed sorting on the column ProductID using the OrderBy method. How can the user tell us which column they want to sort? There are different ways to do this. Turning the table column headers into hyper links is pretty straightforward and widely used in many web applications.
Before we start, we want to modify our action so that it accepts the sorting column sent from the user’s browser. Modify the Products action like below:
[HttpGet]
public ActionResult Products(int page = 1, int sortBy = 1, bool isAsc = true)
{
    IEnumerable<Product> products;

    #region Sorting
    switch (sortBy)
    {
        case 1:
            products = isAsc ? db.Products.OrderBy(p => p.ProductID) : db.Products.OrderByDescending(p => p.ProductID);
            break;

        case 2:
            products = isAsc ? db.Products.OrderBy(p => p.Name) : db.Products.OrderByDescending(p => p.Name);
            break;

        case 3:
            products = isAsc ? db.Products.OrderBy(p => p.ProductNumber) : db.Products.OrderByDescending(p => p.ProductNumber);
            break;

        case 4:
            products = isAsc ? db.Products.OrderBy(p => p.Color) : db.Products.OrderByDescending(p => p.Color);
            break;

        case 5:
            products = isAsc ? db.Products.OrderBy(p => p.StandardCost) : db.Products.OrderByDescending(p => p.StandardCost);
            break;

        case 6:
            products = isAsc ? db.Products.OrderBy(p => p.ListPrice) : db.Products.OrderByDescending(p => p.ListPrice);
            break;

        case 7:
            products = isAsc ? db.Products.OrderBy(p => p.Size) : db.Products.OrderByDescending(p => p.Size);
            break;

        default:
            products = isAsc ? db.Products.OrderBy(p => p.Weight) : db.Products.OrderByDescending(p => p.Weight);
            break;
    }
    #endregion

    products = products
        .Skip((page - 1) * pageSize)
        .Take(pageSize)
        .ToList();

    ViewBag.CurrentPage = page;
    ViewBag.PageSize = pageSize;
    ViewBag.TotalPages = (int) Math.Ceiling((double)db.Products.Count() / pageSize);

    ViewBag.SortBy = sortBy;
    ViewBag.IsAsc = isAsc;

    return View(products);
}
We added two new parameters to the action method, sortBy and isAsc. The sortBy parameter specifies which column to sort by, and the isAsc specifies the direction of sort ascending or descending. Note that we changed the data type of the products variable, so that it matches the return data type of the LINQ methods. We needed this because we deferred the LINQ queries. This means that the results are evaluated only when we call the ToList method. We also used a switch statement to determine the column of sorting. We took advantage of the ternary operator (?:) to specify the sorting direction. Note that we need to access two things in our view in order to provide sorting: sortBy and isAsc.
Now we have to give the end user the ability to sort. Modify the view like below:
@helper sortLink(string name, int id)
{
   <a href="@Url.Action("products", "home", new { sortby = id, isasc = (id == ViewBag.sortBy ? !@ViewBag.isAsc : @ViewBag.isAsc).ToString().ToLower() })">@name</a>
}
<h2 class="center">Products</h2>

<table class="products">
 @* header *@
 <tr>
    <th>@sortLink("ID", 1)</th>
    <th>@sortLink("Name", 2)</th>
    <th>@sortLink("Number", 3)</th>
    <th>@sortLink("Color", 4)</th>
    <th>@sortLink("Standard Cost", 5)</th>
    <th>@sortLink("List Price", 6)</th>
    <th>@sortLink("Size", 7)</th>
    <th>@sortLink("Weight", 8)</th>
 </tr>
Here helpers become really handy. We defined a new helper that will generate the hyper link that will trigger the action with the sorting parameters set. The first parameter name specifies the name of the column header, and id is the number of the column that we used for sorting in the action. The helper sortLink is smart enough to flip the sorting direction when the user clicks twice on the same column.

Let’s make it even nicer. We want to add an arrow to indicate the sort direction. Add the following code to the helper we just created.
@helper sortLink(string name, int id)
{
   <a href="@Url.Action("products", "home", new { sortby = id, isasc = (id == ViewBag.sortBy ? (!@ViewBag.isAsc).ToString().ToLower() : true) })">@name</a>
    if (id == ViewBag.sortBy){
        <span class="arrow @(ViewBag.isAsc ? "up" : "down" )"></span>
    }
}
The previous code simply adds an arrow to the currently sorted column.

There is still one problem. When we click on any page link, the sorting is switched back to the column ProductID. Page links currently do not consider any sorting, so we have to make sure they reflect the current sort column and type.
Modify the buildLinks helper like below:
@helper buildLinks(int start, int end, string innerContent)
{
     for (int i = start; i <= end; i++)
     {
         <a class="@(i == ViewBag.CurrentPage ? "current" : "")" href="@Url.Action("products", "home", new { page = i, sortBy = ViewBag.sortBy, isAsc = ViewBag.isAsc })">@(innerContent ?? i.ToString())</a>
     }

}
Now the page links reflect the sorting direction and column.
Searching
The only thing left to polish our website is searching. We want our users to be able to search the products that we have.
We need to accept a search string from the user. Modify the action like below:
[HttpGet]
public ActionResult Products(int page = 1, int sortBy = 1, bool isAsc = true, string search = null)
{
    IEnumerable<Product> products = db.Products.Where(
            p => search == null
            || p.Name.Contains(search)
            || p.ProductNumber.Contains(search)
            || p.Color.Contains(search));

    #region Sorting
    switch (sortBy)
    {
        case 1:
            products = isAsc ? products.OrderBy(p => p.ProductID) : products.OrderByDescending(p => p.ProductID);
            break;

        case 2:
            products = isAsc ? products.OrderBy(p => p.Name) : products.OrderByDescending(p => p.Name);
            break;

        case 3:
            products = isAsc ? products.OrderBy(p => p.ProductNumber) : products.OrderByDescending(p => p.ProductNumber);
            break;

        case 4:
            products = isAsc ? products.OrderBy(p => p.Color) : products.OrderByDescending(p => p.Color);
            break;

        case 5:
            products = isAsc ? products.OrderBy(p => p.StandardCost) : products.OrderByDescending(p => p.StandardCost);
            break;

        case 6:
            products = isAsc ? products.OrderBy(p => p.ListPrice) : products.OrderByDescending(p => p.ListPrice);
            break;

        case 7:
            products = isAsc ? products.OrderBy(p => p.Size) : products.OrderByDescending(p => p.Size);
            break;

        default:
            products = isAsc ? products.OrderBy(p => p.Weight) : products.OrderByDescending(p => p.Weight);
            break;
    }
    #endregion
    ViewBag.TotalPages = (int)Math.Ceiling((double)products.Count() / pageSize);

    products = products
        .Skip((page - 1) * pageSize)
        .Take(pageSize)
        .ToList();

    ViewBag.CurrentPage = page;
    ViewBag.PageSize = pageSize;
    ViewBag.Search = search;

    ViewBag.SortBy = sortBy;
    ViewBag.IsAsc = isAsc;

    return View(products);
}
We made decent changes to our previous code. The Where method is used for filtering, and we used it to retrieve the products that match some pattern. The first condition search == null returns true when the user has not entered any search criteria, and thus returns all products.
Clearly, the number of products will change depending on the search criteria, so we adjusted ViewBag.TotalPages. Now the products number is updated after search.
Every time you add some features to a controller that takes input from the user, you have to tweak your views to reflect the changes.
We’ll add the search form first. Add the following DIV panel under the title.
 <div class="product-search"
>

<form action="@Url.Action("products", "home")" method="get">
    Search <input id="search" name="search" type="text" value="@ViewBag.Search" />
    <input type="submit" value="Search" />
</form>

</div>
Now we need to fix the page links again to reflect the search:
@helper buildLinks(int start, int end, string innerContent)
{
     for (int i = start; i <= end; i++)
     {
         <a class="@(i == ViewBag.CurrentPage ? "current" : "")"
         href="@Url.Action("products", "home", new { page = i, sortBy = ViewBag.sortBy, isAsc = ViewBag.isAsc, search = ViewBag.Search })">@(innerContent ?? i.ToString())</a>
     }

}

Now our gridview looks professional!
We tackled the problems one by one. As soon as we finished implementing a feature in our controller, we moved to the view to reflect our changes.
Another nice feature that you can do is allowing the user to adjust the page size.
I hope this helps.
Comments