How to Quickly Secure Frontend Apps with Little Code using Upend
27 Oct 2023 · Comments
Introduction
In this post, I am going to show you how to add authentication and authorization to a frontend app with little coding.
Although there are different simple techniques online that mimic auth by showing and hiding html elements depending on whether a user is authorized or not; these techniques are NOT secure and can by bypassed easily. While it is ok to show or hide elements based on auth status, this is merely done to provide a better user-experience. The proper way to achieve this would always involve a backend server.
At the end of this post, your app will have a form where users can log in or sign up

and a place where the app content is secured using a backend server that only authenticated users can see
Setup and Prerequisites
I am going to use Node.js as the backend server though any other framework suffices.
For the frontend, I am going to use plain html. There will be two files: index.html and login.html.
login.htm will host the login or signup form for the app whereas index.html will contain the main app content after a user authenticates.
The Node.js server will host these two html files.
For authentication, I will use a low-code service that will provide authentication and authorization with little code.
The goal is to save time and effort, so one can focus more on the app itself rather than on peripherals.
Additionally, rolling out one’s own auth is generally not considered a good idea.
Below is a summary of the user tools and services so far:
- Node.js: Backend server that serves requests and secures the frontend app. Download at https://nodejs.org/en/download
index.html: Html file that hosts main content for the app after the user logs in.login.html: Html file that hosts the login or signup form for the app.- Upend account: Low-code Auth provider.
Creating the Frontend App
The frontend app will be hosted locally using Node.js at url http://localhost:3000. The app will have two pages: one for login/signup with url http://localhost:3000/login and the other for after login/signup http://localhost:3000/.
- First, install Node.js and create a folder with two files in it:
index.htmlandlogin.html. In each file, paste the following html<!doctype html> <html lang="en"> <head> <meta charset="utf-8"> <title>My App</title> </head> <body> </body> </html> - Create an Upend account and click on New App:
- For Trusted origins, enter
http://localhost:3000. This whitelists the urlhttp://localhost:3000for Javascript communication with their backend server. - For Login Url, enter
http://localhost:3000/login. Upend will redirect users to this login page where they can log in. - For Post Login Url, enter
/. For better user experience, you want users to automatically be redirected to http://localhost:3000/ after they log in successfully. - Leave Use built-in UI for users login and signup as the default option.
- For Token Validation, check Automatically send the access token. if it’s not already checked. For Trusted URLs, enter
http://localhost:3000and click on Add. This is your backend server URL where the frontend app sends the access token for authorization and data lookup. - Click on Finish.
- From the Installation section, copy the Html code block that says Copy the following JavaScript code and paste it inside the head element of your website pages and paste it inside both
index.htmlandlogin.htmlright below the<title>..</title>tag such as the following example<!doctype html> <html lang="en"> <head> <meta charset="utf-8"> <title>My App - Login</title> <script type="text/javascript"> (function(u,p,e,n,d){ u[e]=u[e]||function(){u[e]={};u[e].x=1;u[e].id=d;u[e].ready=new Promise(function(a,b){u[e].rs = a;u[e].rj=b});return u[e];}(); if(u[e].x){delete u[e].x;g=p.createElement("script");g.async=1;g.src="https://app.upend.cc/widget/upend.js"; p[n].insertBefore(g,p[n][0]);} })(window, document, "upend", "head", "g899pQh2Pepw94A8UveS.yVlVA4dTyv0hcQEQmBn_"); </script> </style> </head> <body> </body> </html>The above install a lightweight Javascript library that does the heavy lifting for authentication.
- From the Installation section, copy the Html code block that says Copy the following Html code and paste it where you want to show the login and signup forms on your website pages and paste inside the
login.htmlinside the<body>..</body>tag such as the following... <body> <upend-login></upend-login> </body>The above Html code will render the login/signup form for the user to log in.
- For Trusted origins, enter
Creating Backend Server
Create a new file called app.js with the following content:
const http = require('http');
const fs = require('fs');

const server = http.createServer(async (req, res) => {

    switch (req.url) {
        // http://localhost:3000/data
        case "/data":
            break

        // http://localhost:3000/
        case "/":
            res.writeHead(200, { 'content-type': 'text/html' });
            fs.createReadStream('index.html').pipe(res);
            break

        // http://localhost:3000/login
        case "/login":
            res.writeHead(200, { 'content-type': 'text/html' });
            fs.createReadStream('login.html').pipe(res);
            break
    }
})

server.listen(3000, async () => {
    console.log('Server is running on http://localhost:3000');
});
The above code returns the index and login html files when the urls http://localhost:3000 and http://localhost:3000/login are accessed, respectively.
A third url http://localhost:3000/data will be used by the frontend app to display private user information if they are logged in. This endpoint must be protected in two ways:
- Only logged-in users can access it (Authentication).
- Users can only access their data and no other users unless they are an admin (Authorization)
Run the following command inside the project folder
node --watch app.js
Open the url http://localhost:3000/login in your browser. You should see a login form if you followed the steps above correctly. Click on Sign up and register an account, make sure you have access to that email address you use since you will need it to log in. After you log in, you should be redirected from http://localhost:3000/login to http://localhost:3000 which shows an empty screen.
Taking advantage of data tags, in order to print a welcome message which shows
the logged-in user first and last names, add the following Html code inside the <body> element of index.html
<div id="main">
<a data-upend-log-out data-upend-logged-in="display" href="javascript:void(0);"
style="display: none; float: right;">Log out</a>
<h3 data-upend-logged-in="display" style="display: none; clear: both;">Welcome <span data-upend-set="profile.firstName profile.lastName"></span></h3>
</div>
The tag data-upend-set will update the inner content of the element to show the user first and last name.
data-upend-logged-in="display" will only display the element if the user is logged in.
data-upend-log-out will log the user out when the element is clicked.
The tags data-upend-* have a special meaning and are documented at https://app.upend.cc/account/documentation/data_attributes#data_attributes.
The full index.html file now should look like the following:
<!doctype html>
<html lang="en">
<head>
<meta charset="utf-8">
<title>My App</title>
<script type="text/javascript">
(function (u, p, e, n, d) {
u[e] = u[e] || function () { u[e] = {}; u[e].x = 1; u[e].id = d; u[e].ready = new Promise(function (a, b) { u[e].rs = a; u[e].rj = b }); return u[e]; }();
if (u[e].x) {
delete u[e].x; g = p.createElement("script"); g.async = 1; g.src = "https://app.upend.cc/widget/upend.js";
p[n].insertBefore(g, p[n][0]);
}
})(window, document, "upend", "head", "hkl9pQh2Pepw94A8UveS.yVlVA4dTyv0hcQEQmBn_");
</script>
<style>
#main {
text-align: center;
}
</style>
</head>
<body>
<div id="main">
<a data-upend-log-out data-upend-logged-in="display" href="javascript:void(0);"
style="display: none; float: right;">Log out</a>
<h3 data-upend-logged-in="display" style="display: none; clear: both;">Welcome <span
data-upend-set="profile.firstName profile.lastName"></span></h3>
</div>
</body>
</html>
Save the changes and refresh the your browser page. You should now see the user first and last name welcome message:
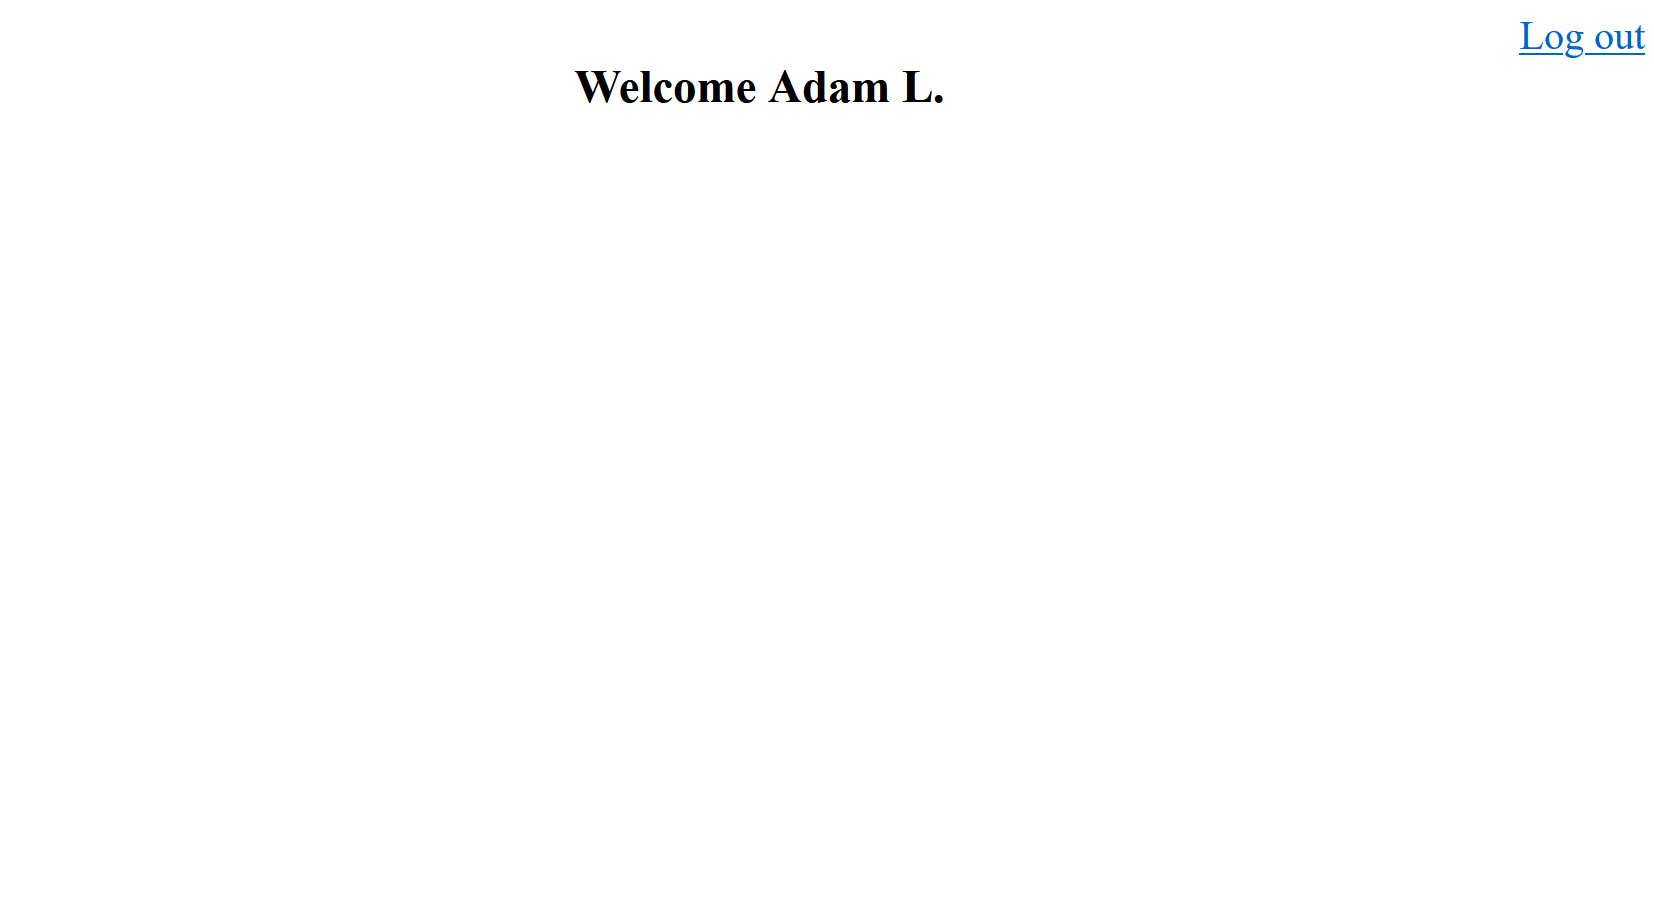
Now the user has an access token since they are logged in. The next task would be to invoke the endpoint http://localhost:3000/data
and retrieve the user private data.
To validate the incoming access token in the endpoint /data, install the following package from your command line
npm install jose
Edit the app.js file such as the following
const http = require('http');
const fs = require('fs');

// Run 'npm install jose' to install the following dependency.
const jose = require('jose');


// Corresponds to the "Signing Key" under the "Security" tab of your Upend app
const jwk = {
    kty: 'RSA',
    alg: 'RS256',
    n: '4sND7UCJR-1HWAChx45M616SVt_3-bqqNaY9ph5RW0QBkodv8KbJg-_3s0A0HL36EEJVRNDlv_AASqYdngZCYtbqHnGRj6BdqR3ys72Pinr3tmJFCfQcvJ7BXbyCY9eik1k5NPDYCtwcqAWSjGJOv3Odbza29J1uw2WyYbHziE_k9gZpowiHYXZvpT6tXlwFe331_uQ1tac85QB_cvKp9tT2UAJrDCxiHZU-ZkE_beioIQxb_2RWWgWl9a7WrRE-eeG6VOFdqRZmfctrbDMxQgLH7XFahyTIM4rkqw8295QfbaBmneb-gNz0K5uIU4JpWI4MHt0ctH-qIUbPLORzfw',
    e: 'AQAB',
}

// Public key for token validation
var publicKey = null;

// Secret data. Normally this would be stored remotely in a secure database.
const data = [
    {"email": "adaml@gmail.com" ,"ssn": "8806356698", "secret": "12143" },
    {"email": "johnl@gmail.com" ,"ssn": "8896356698", "secret": "5436" }];

const server = http.createServer(async (req, res) => {

    switch (req.url) {
        // http://localhost:3000/data
        case "/data":

            // Validate token before returning any sensitive data.

            // Extract access token from header
            const token = req.headers.authorization?.split(' ')?.splice(-1)?.at(0);
            console.log('Parsed token', token);

            if (token == null) {
                // Missign token, return 401.
                res.writeHead(401);
                res.end();
                break
            }

            try {
                const { payload, protectedHeader } = await jose.jwtVerify(token, publicKey, {
                    // Must be "App ID" under "Main" tab in Upend
                    issuer: 'yVlVA4dTyv0hcQEQmBn_',
                });

                // Token is valid at this point.
                console.log(payload);

                // User email is `payload.email`.
                // Use `payload.email` field to update or lookup any user related info.
                const userData = data.filter(d => d.email.toLowerCase() === payload.email.toLowerCase())

                // Return response
                res.setHeader("Content-Type", "application/json");
                res.writeHead(200);
                res.end(JSON.stringify(userData));
                break

            } catch (ex) {
                console.error('Error validating access token:', ex.message);
                res.writeHead(401);
                res.end();
                break
            }

        // http://localhost:3000/
        case "/":
            res.writeHead(200, { 'content-type': 'text/html' });
            fs.createReadStream('index.html').pipe(res);
            break

        // http://localhost:3000/login
        case "/login":
            res.writeHead(200, { 'content-type': 'text/html' });
            fs.createReadStream('login.html').pipe(res);
            break
    }
})

server.listen(3000, async () => {
    publicKey = await jose.importJWK(jwk, jwk.alg);
    console.log('Server is running on http://localhost:3000');
});
Update the variable jwk with your Upend app key which is located under Security->Signing Key.
Update the variable issuer to match your upend app ID which is found at Main->App ID.
Update one of the emails in the variable data to match the Upend user’s email that you created.
Here the variable data mimics what would be a database call or some external API that fetches private data.
When a request comes in to http://localhost:3000, the frontend will send the user access token along with it automatically.
This was done by the Upend Js library and hence the value you whitelisted in the Token Validation Upend step.
The endpoints /index and / are public and require no authorization.
/data on the other hand will have to authorize the user and return their private data.
The logic in the /data route will extract the access token from the incoming HTTP request header and validate it by calling
jose.jwtVerify, if the token is not valid or an error occurs, an error of 401 Unauthorized is returned to the user.
If the access token is valid, you can look up the user email from the access token itself.
Notice how the endpoint does not expect the user to send their email manually in the request and instead pull it from the access token.
This is important since the user can send a fake email in the request. The takeaway is to trust input from the access token, not from the user.
Now the frontend should be updated to pull the user private info from the /data endpoint by matching their email address to the data variable.
Edit the index.html file to add a button and JS code. It should look like the following:
<!doctype html>
<html lang="en">
<head>
<meta charset="utf-8">
<title>My App</title>
<script type="text/javascript">
(function (u, p, e, n, d) {
u[e] = u[e] || function () { u[e] = {}; u[e].x = 1; u[e].id = d; u[e].ready = new Promise(function (a, b) { u[e].rs = a; u[e].rj = b }); return u[e]; }();
if (u[e].x) {
delete u[e].x; g = p.createElement("script"); g.async = 1; g.src = "https://app.upend.cc/widget/upend.js";
p[n].insertBefore(g, p[n][0]);
}
})(window, document, "upend", "head", "jhds9pQh2Pepw94A8UveS.yVlVA4dTyv0hcQEQmBn_");
</script>
<style>
#main {
text-align: center;
}
</style>
<script>
async function retrieveData() {
const dataEl = document.getElementById('data');
try {
const httpResponse = await fetch(`/data`);
if (!httpResponse.ok) {
dataEl.innerHTML = `An error occurred: ${httpResponse.status} ${httpResponse.statusText}`;
return;
}
const response = await httpResponse.json();
let html = '';
response.forEach(r => {
html += `<p> <b>SSN</b>: ${r.ssn}</p> <p> <b>secret</b>: ${r.secret}</p>`
});
dataEl.innerHTML = html;
}
catch (ex) {
console.error(ex);
dataEl.innerHTML = ex.message;
};
}
</script>
</head>
<body>
<div id="main">
<a data-upend-log-out data-upend-logged-in="display" href="javascript:void(0);"
style="display: none; float: right;">Log out</a>
<h3 data-upend-logged-in="display" style="display: none; clear: both;">Welcome <span
data-upend-set="profile.firstName profile.lastName"></span></h3>
<button onclick="retrieveData()">Retrieve Data</button>
<div id="data">
</div>
</div>
</body>
</html>
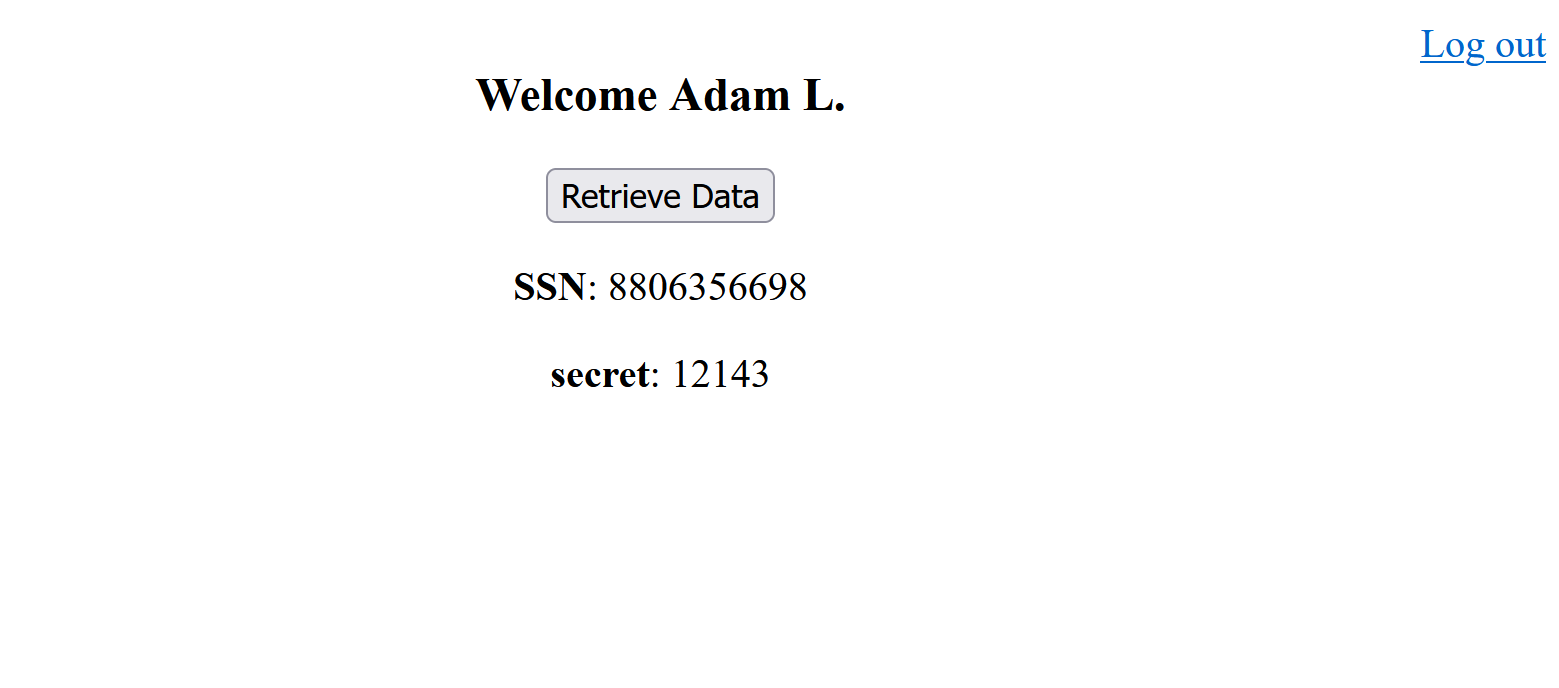
when the “Retrieve Data” button is clicked, the JS method retrieveData is called which sends an HTTP request to the
http://localhost:3000/data endpoint and prints the result in the DIV below it.
Save changes and refresh the page. Click on the button and you should see the following

If you are not logged in and click on the button, you should see the following error:

User Roles
Often, one needs more granularity when it comes to authorizing users. For example, some of you users might be admins and those users have more privilige than a regular user.
In this case, an admin should be able to read all secrets using the /data endpoint.
To enable roles, go to Upend and click on Attributes tab and add the following roles attribute:
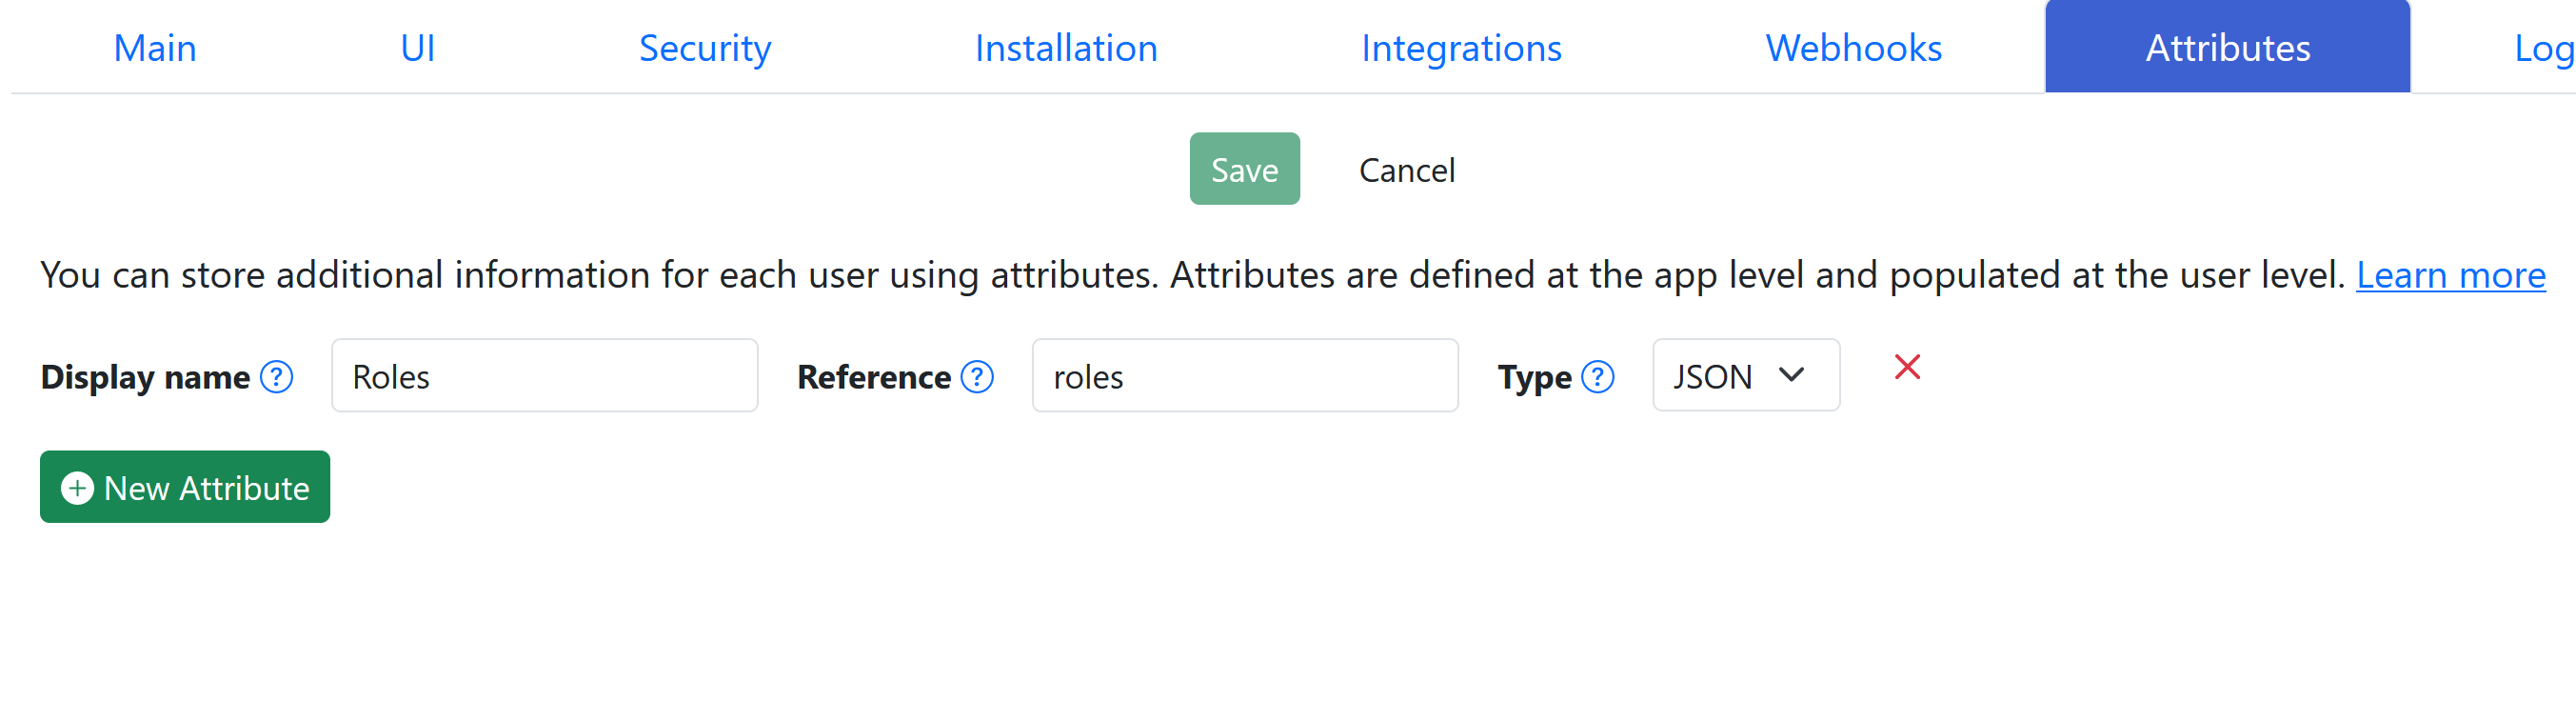
This will enable “roles” and thus users can be assigned a role.
To make a user an admin, click on Users from the top bar and locate the Upend user that you created.
Click on the + sign to expand the view and then click Edit.
You should see Roles under attributes.
Enter ["Admin"] in the textbox and click on Save.
Update the app.js /data endpoint to return all data if the user is an admin so that the try block looks like the following:
        const { payload, protectedHeader } = await jose.jwtVerify(token, publicKey, {
            // Must be "App ID" under "Main" tab in Upend
            issuer: 'yVlVA4dTyv0hcQEQmBn_',
        });

        // Token is valid at this point.
        console.log(payload);

        // User email is `payload.email`.
        // Use `payload.email` field to update or lookup any user related info.

        let userData;
        // Use `payload.roles` if you enabled them
        if (payload.roles.indexOf('Admin')>=0) {
            // User is an admin
            // Grant extra privilege
                userData = data;
        } else {
            // Regular user. They can only see their data.
                userData = data.filter(d => d.email.toLowerCase() === payload.email.toLowerCase())
        }

        // Return response
        res.setHeader("Content-Type", "application/json");
        res.writeHead(200);
        res.end(JSON.stringify(userData));
        break
Notice access token now contains a “roles” claim which will hold a list of roles.
If you are logged in, log out for the changes to take effect.
Log in again and click on the button and notice that all data has been returned, not just the current user’s.

Further Tweaks
Notice if you log out or not logged in, you can still access the index.html page at http://localhost:3000.
Although it is safe to display index.html for unauthenticated users, it is considered poor user experience.
To redirect the users automatically to the login page, you can add the tag data-upend-redirect="!loggedIn: /login" to the <body>
element inside index.html such as the following
<body data-upend-redirect="!loggedIn: /login">
...
</body>
and vice versa, you could also redirect logged-in users from the login page to the index page by adding the following tag
<body data-upend-redirect="loggedIn: /">
...
</body>
If you want to center the login/signup form vertically on the screen, add the following CSS under the </script> tag in the login.html file
<style>
 upend-login::part(upend) {
    display: flex;
    align-items: center;
    justify-content: center;
    min-height: 100vh;
 }
</style>
See this codepen for more customizations on the login form.
Comments