Top Okta Competitors and Alternatives in 2025
01 Nov 2025 · CommentsTop Okta Alternatives
- Upend
- Microsoft AD B2C
- Amazon Cognito
- Auth0
- OneLogin
- PingIdentity
- Keycloak
- SecureAuth
- Azure AD
- FusionAuth
Looking for Okta IAM alternatives?
This post covers the competitors or alternatives to Okta in a comparative study of Okta alternatives and their features focusing on the IAM umbrella.
Okta is an IAM solution. It focuses on organizations complex identity scenarios that satisfy the enterprise requirements and policies. It can be overwhelming for small teams and businesses.
The biggest disadvantages of Okta include the following:
- Initial setup and steep learning curve: It takes considerable time and effort to implement Okta IAM. This time and effort translate into money being squandered on a non-core feature of your business.
- Documentation: While Okta has good documentation, it is scattered all over their websites, and it is hard to find what one is looking for without manual search.
- Cost: Okta is an expensive solution especially if you have a small to medium business. The pricing model is not simple and the cost per monthly active user is high and can easily exceed your budget.
Top Alternatives to Okta
1. Upend
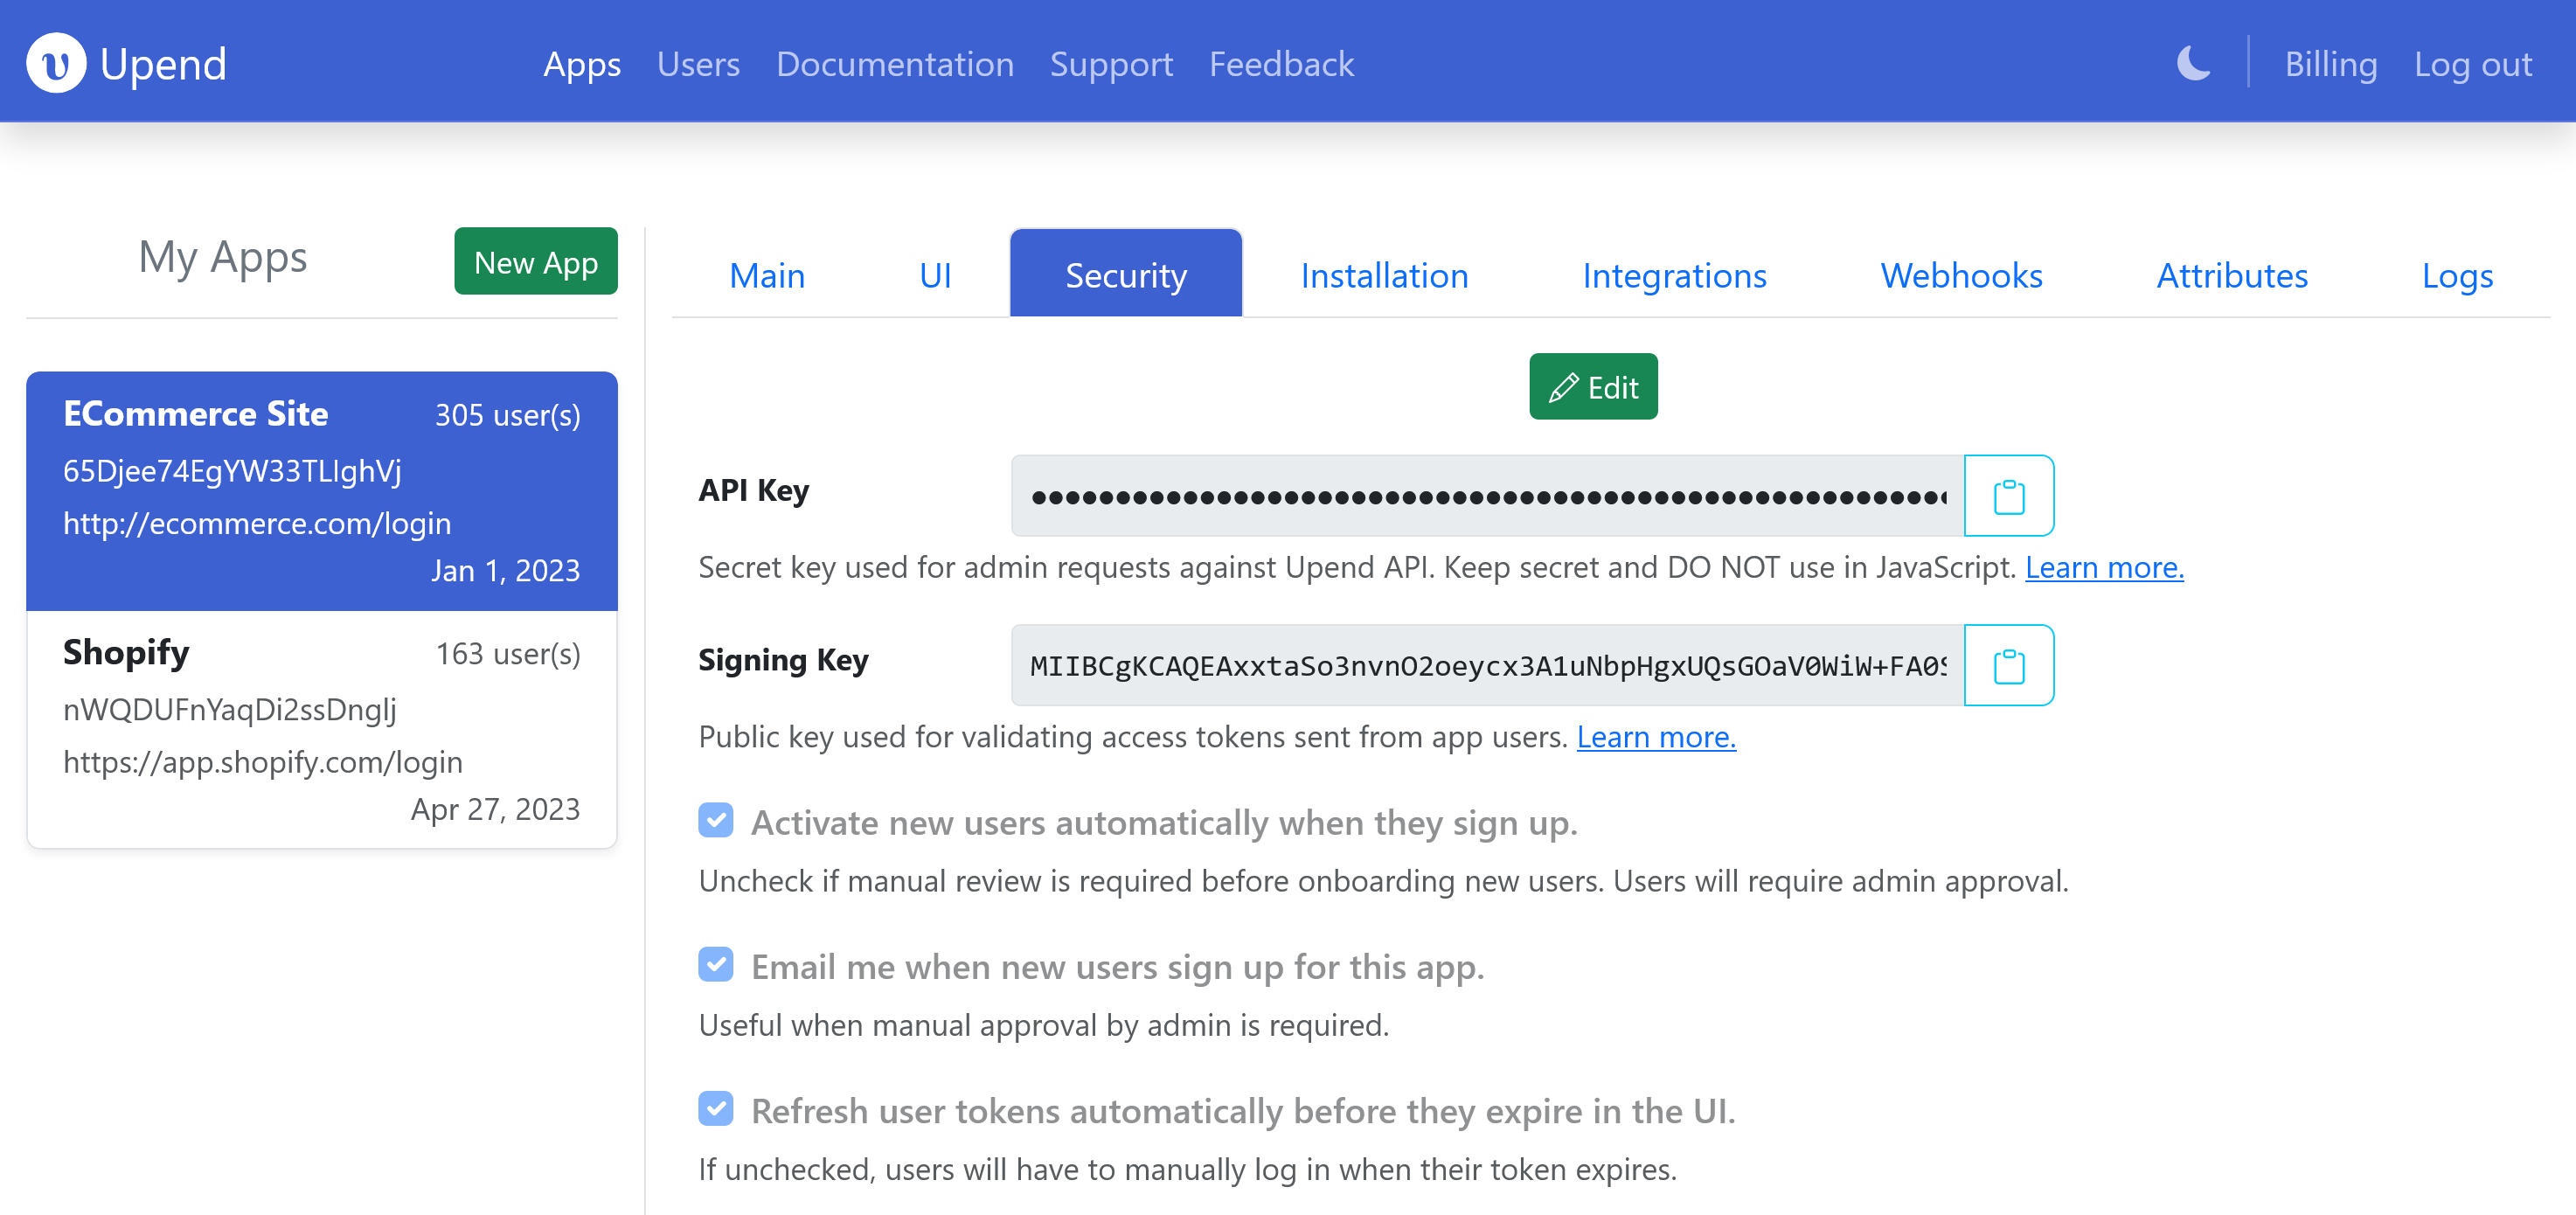 Upend is an IAM solution for individuals and small to medium enterprises. It is passwordless and focuses on low-code and ease of integration.
Upend supports Multi-Factor Authentication (MFA) which can be set up easily. It also provides a user portal which your end-users can access to update their info and see their login access history.
With Upend, configuring Single Sign-On (SSO) is easy and can be done in only few clicks. Single Sign-On allows your users to log into one of your apps and then automatically access your other apps without having to manually log in again. This reduces friction and improves the user experience. Upend relies on creating an SSO group which is simply a list of your apps that you want to enable SSO for. An SSO group is created with the list of apps that you want to enable SSO for. Users will only need to log into any one of the apps on the list once per session. One advantage over Okta’s SSO is that in Upend SSO also works for social providers such as Google.
In Upend, setting up a new app configuration is seamless. A wizard launches that guides you step-by-step to configure your application. An app to Upend is the configuration of your app or website that is being secured. The whole configuration process is simplified and only asks the minimum required questions. After the configuration wizard completes, you can copy the resultant snippet html markup code and paste that into your web app html pages.
Users in Upend are pooled so that they can be shared across your apps. Although users are shared across your apps, private app attributes are not shared across apps. For example, the roles for a user in app A are different from app B for that same user. This maintains a balance between flexibility and maintenance. You can store additional information for each user using attributes. Attributes can be public or private. Public is intended for the user to see it and potentially update its value, whereas private means the user cannot see or change its value unless it is explicitly done (such as the roles JWT claim which can be read in the access token, sew below for more).
Unlike many other alternatives, user names or logins can be changed by the user after the user is created. Username is an attribute of a user that is unique across all your apps. By default, when users sign up, they are prompted to enter their email address and that is used as their username. While this lowers friction and providers a better user experience, some admins require users to manually enter their username.
Upend advantages over Okta:
- Cost: Upend’s cost is a fraction of Okta’s. The cost per user is a lot lower as well.
- Initial setup: Upend is the easiest solution to set up on this list. Very small learning curve to none. In only few minutes, one can set up. A wizard will guide you step-by-step through the process and all the steps are well documented. It can be integrated with little or no code at all due to its powerful low-code features. It can be integrated seamlessly into your websites or apps using a tiny JavaScript snippet that performs all the heavy lifting for your app.
- Use: Easier to use since features are all organized into a single place.
- UI: The Admin UI is more user-friendly than Okta’s. It is responsive and mobile-friendly. Additionally, the end-user UI such as the login page can be tweaked directly using CSS styles, which you can add directly to your website. They also support bringing your own UI if needed.
Upend is a great passwordless and low-code IAM solution.
2. Azure Active Directory B2C
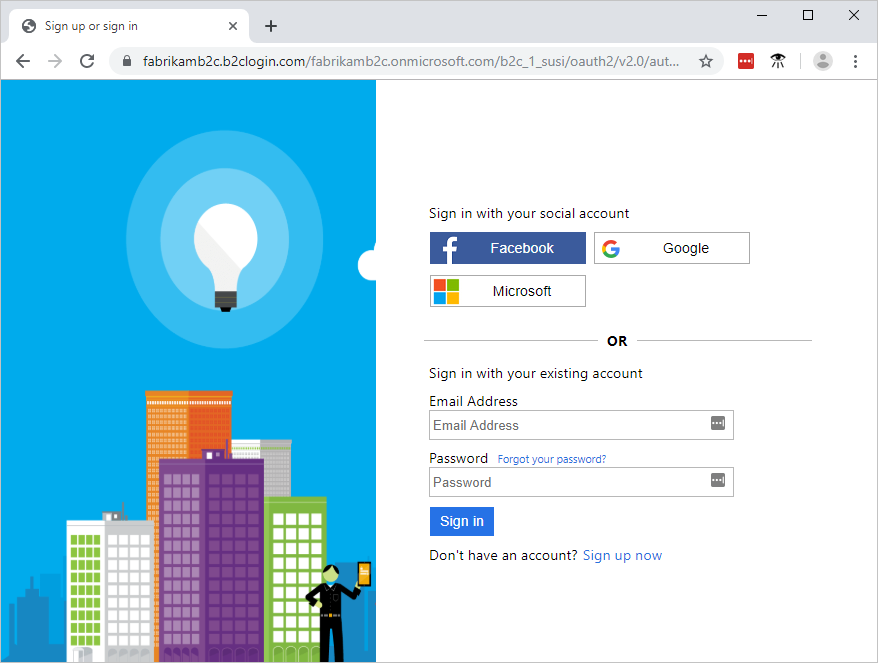
Azure AD B2C solution is built on the same technology as Microsoft Entra ID but is a separate service. It allows businesses to build customer facing applications, and then allow anyone to sign up and sign in to those applications with no restrictions on user account. One can customize the HTML, CSS, and JavaScript.
While Azure AD B2C is a great solution, it comes with limitations. For example, there is still a learning curve for the initial setup. Also, it is short on flexibility: It is not possible to use a custom email template or SMS for users communication. It does not seem possible to change the user name or enforce a certain format.
Azure AD Advantages over Okta:
- Cost: The cost per user is a lower and a lot cheaper than Okta.
- Use: There is some learning curve but still easier to use than Okta.
Azure AD B2C is a great solution if you don’t mind compromising on flexibility.
3. Amazon Cognito
Amazon Cognito allows you to authenticate and authorize users from the built-in user directory, from your enterprise directory, and from consumer identity providers like Google and Facebook.
Amazon Cognito comes with limitations as well. For example, customizing the hosted UI is very limited. Also, Amazon Cognito relies on a user pool, which is a Cognito directory where users are stored. You can only set user attributes at the time of creation of the user pool. In case settings need to be changed, one must create another user pool, since there is no way to instantly migrate the users from one to another. Another issue is fine-grained control over features such as controlling the access token lifetime and expiration.
Amazon Cognito Advantages over Okta:
- Cost: Cheaper than Okta. The cost per user is a lower as well.
Amazon Cognito is a good solution if you don’t mind compromising on flexibility and customization.
4. Auth0
Auth0 is a platform offering IAM services for web and mobile applications which include Multi-Factor Authentication (MFA) and Single Sign-On (SSO). Auth0 is aimed at developers, and it was a popular choice among developers in the past. However, after its acquisition by Okta, customers have been seeking an alternative due to its rising prices. Auth0 is still easier to integrate than Okta. The desktop Admin UI is user-friendly but not so mobile-friendly.
Auth0 Advantages over Okta:
- Cost: Still cheaper than Okta. The cost per user is a lower as well.
- Learning Curve: There is some learning curve especially for non-developers.
Auth0 is a good solution if your team is made of mostly developers.
5. OneLogin

OneLogin offers shared login capabilities, beneficial for team-based access, and it has a reliable customer support and extensive documentation. OneLogin does have limitations though. For example, they have an average API support and limited features. They also have complex integrations.
OneLogin Advantages over Okta:
- Cost: OneLogin can be more cost-effective, particularly for small to mid-sized organizations
6. PingIdentity

PingIdentity excels in complex, large-scale environments. It is ideal for large organizations with complex requirements. It has strong integration capabilities with various applications and identity providers. PingIdentity provides advanced security features, including adaptive authentication and Multi-Factor Authentication (MFA). It is also customizable to fit specific business needs. However, PingIdentity can be complex and time-consuming to set up and manage.
PingIdentity Advantages over Okta:
- Support: PingIdentity has good customer support
7. Keycloak

Keycloak is open source. It is free to use and highly customizable. Keycloak offers Single Sign-On (SSO), Multi-Factor Authentication (MFA), and social login. It has strong community backing with extensive documentation and integrates well with various applications and identity providers. However, Keycloak requires more effort and expertise to set up and configure. The ongoing maintenance and updates can be resource-intensive. It might need significant resources for high performance.
Keycloak Advantages over Okta:
- Cost: Keycloak is open-source and free, while Okta is a premium service.
8. SecureAuth
SecureAuth integrates well with legacy systems and diverse IT environments. It is highly customizable security policies and authentication flows. SecureAuth emphasizes adaptive authentication and Multi-Factor Authentication (MFA). However, the initial configuration can be complicated, and it has slower customer support. Additionally, SecureAuth can be costly, especially for smaller businesses.
SecureAuth Advantages over Okta:
- Legacy System Support: SecureAuth integrates well with legacy systems.
9. Azure AD
Azure AD integrates well with Microsoft products and services, and it can handle large enterprise environments efficiently. It offers robust security features including Conditional Access and Multi-Factor Authentication (MFA). However, it can be complex to configure, especially for non-Microsoft environments and has a steep learning curve.
Azure AD Advantages over Okta:
- Integration: Azure AD is ideal for Microsoft-centric environments, while Okta offers broader third-party integrations.
- Cost: Azure AD can be more cost-effective for existing Microsoft users.
10. FusionAuth
FusionAuth is customizable with support for various authentication methods. It includes multi-factor authentication (MFA), single sign-on (SSO), and comprehensive user management. FusionAuth can handle a large number of users, suitable for both small and large organizations. However, the initial setup and configuration can be complex, and its administrative UI may not be as intuitive. It also requires a learning curve due to its extensive features and customization options.
FusionAuth Advantages over Okta:
- Cost: FusionAuth offers a more flexible pricing structure, which may be more affordable for certain users, while Okta tends to be more expensive.